
With the Amplify Plugin SDK custom plugins can be created for the Amplify platform.
This enables 3rd-party developers, from clients or agencies, to extend the functionality of the chatbot e.g., with custom integrations to their CRM systems.
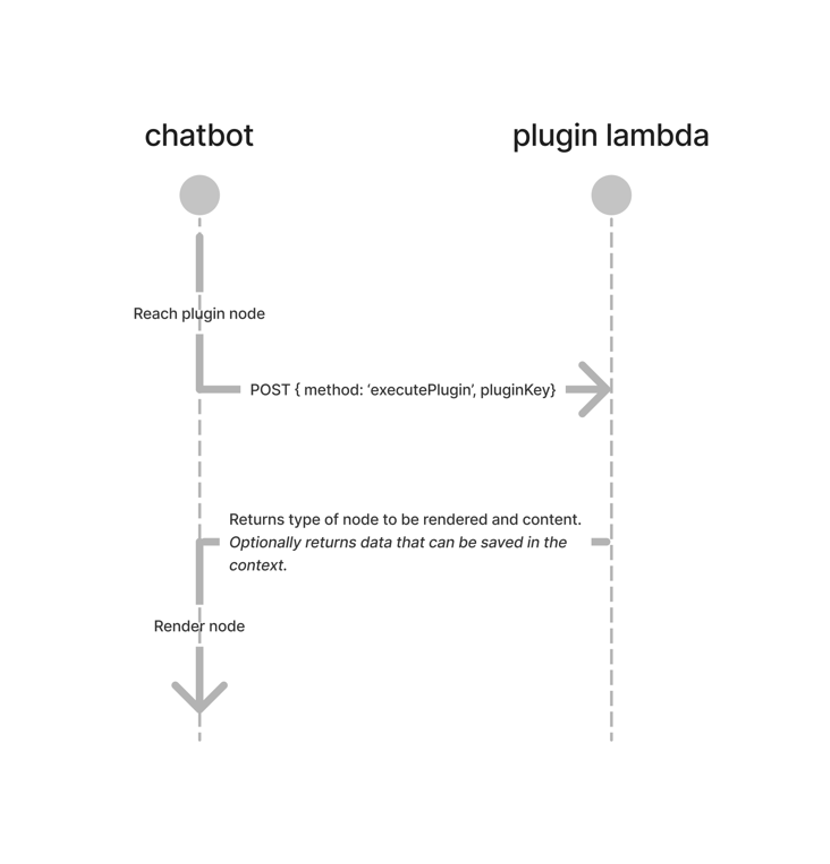
Purpose
The goal of the SDK is to enable customers to create any integration within the boundaries of the SDK.
Similarly, it provides Anthill with a platform for creating out-of-the-box integrations within Amplify.
Plugins give Amplify subscribers the option to create their own functionality as part of a conversational bot flow. An Organization plugin will be hosted from a lambda in AWS, and each organization will have its own lambda(s) that contain the deployed plugins to that organization.
The lambda running plugins are dual purpose: Making a post request with { method: getAllPlugins } that returns a list of all available plugins including their settings, etc., and { method: executePlugin } which can be used to execute a plugin during conversation runtime.
Each plugin can be dragged into any step of the conversation tree, which allows for:
-
Storing information that can be retrieved in the conversation tree and used. An example would be a plugin to query the customers' Salesforce API and return the name of the visitor based on an email.
-
Returning output to a conversation, such as a message node, carousel, etc.
An example of the implementation would be to return a JSON string parseable by the Amplify UI:
{
  type: String,
  message: Object
}
Rules Plugins adhere to
The plugins developed follow a simple set of rules, which is:
-
The function should take no more than 5s to execute.
-
It will store its input in the global context.
This enables you to create any sort of integration, provided you adhere to the time-limit which is generous. It’s recommended to be speedier than this of course, to ensure a consistent and good User Experience.
Any data you store can be saved in the global context of your conversation (your amp). This enables you to output or create conditional nodes with the data you’ve collected, which is useful for personalization, and conversational workflow logic (user said this, so do that).
Command-line Interface (CLI)
A command line interface has been created that enables Developers, both at Anthill and at customer organisations’, to create, deploy, and execute Plugins within the infrastructure of Amplify.
Currently, the SDK is available upon request, but it’s due to be deployed to NPM very soon.
Usage
Installation
To download and install the Amplify CLI run the following command after you’ve installed the SDK:
npm install @anthill.technology/amplify-cli --global
This will provide you with the globally accessible amplify command.
Log into the Amplify CLI
After installing the CLI, you must authenticate.
Log into Amplify using your account by running the following command:
amplify login
Test that the CLI is properly installed and accessing your account by listing your organizations.
Run the following command:
amplify use
You will be prompted to select an active organization. To change the active organization re-run the above command.
List Available Plugins
To create a new plugin. Run the following command:
amplify plugin:create
You will be prompted to select a plugin type and a name for the plugin. A new directory will be created in your local path using the name of the plugin.
tree ./example-plugin
./example-plugin
├ config.js
├ index.js
└ package.json
The directory contains the following structure. For more information regarding supported schemas based on each plugin type, see schemas in the SDK package.
Deploy an existing plugin
To deploy a new plugin. Run the following command:
amplify plugin:deploy --directory <path-to-folder>
To redeploy an existing plugin, re-run the above command.
A step-by-step guide on working with the Plugin SDK can be found here: https://help.amplify.anthill.technology/sup/creating-and-deploying-plugins